Modules and SDK
Modules
To get the latest version of the Payplug module for your CMS, please contact your account manager.
warning
Any customization of your module, even minor, can generate serious malfunction for which the module will not be eligible for assistance anymore.
Payplug module for PrestaShop 1.7
Supported languages:
- English
- French
Available payment method:
- CB Visa MasterCard
- American Express
- PayPal
- Oney 3X / 4X
- P24
Features:
- 3-D Secure
- Standard payment
- Delayed payment
- N-times payment
- One-click payment
- Refund
- Void
Introduction
Payplug gives you access to several payment methods. Each of them offers an online payment solution for e-merchants.
These payments methods can offer you different payment option:
- Standard payment
- One click payment
- Deferred payment
- N-times payment
- At delivery payment
Constraints
The Payplug module dynamic payment by internet module must be powered by an XML provided by PAYPLUG in order to get the available payment methods.
If a customer wants to use one of the payment methods, he has to make sure that the module is well installed and configured.
The call of the CRON must be done every night. It allows to execute the deferred payments.
The URL to launch is the following: http://[your_site_url]/modules/dalenys/cron.php
You must ask your host for setting up.
Module Installation
The installation of the module takes place by this way:
-
Go to the Modules tab of the back office of your shop, click on “Add a module from my computer” and download the zip file of the module
-
Back in the Modules tab, research with the name “Payplug”
-
When it appears, click on the « Install » button to start installation
-
When the installation is done, you can see links Disable, Reset, Configure, Delete on the module
-
Click on Configure
-
A module configuration page is displayed. You have two headings:
Servers parameters
Use advices
-
The Payplug module has a CRON which needs to be configured. The CRON will check if the configured capture date has occurred. If it’s ok, the capture starts.
Overall configuration of the module
Update the list of available accounts
The module provides you several means of payment (Paypal, American Express, etc.). In order to give you access to new payment methods over time, they are retrieved via an XML. To be able to use them you will only have to recover the new version of the XML making these available.
During the initial installation of the module you have to do it in order to recover the current version of the XML.
To do this, you only have to click on the button “update the list of accounts”.
Important:
If you change the XML update URL, please first save your configuration before pressing the “Update Account List” button to take into account this new URL.
A load indicator will appear on the screen, please do not leave the screen during this process and wait for the update message.

Server settings
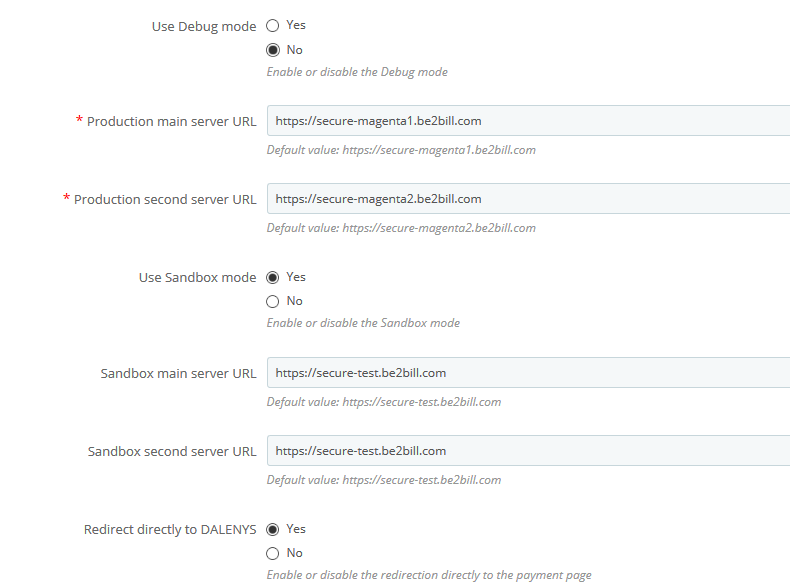
The « Servers parameters » tab indicates the production and test URLs of Payplug. You can also enable log storage and sandbox mode (test) on this tab.
URLs are provided by Payplug.
They are essential for communication between your PrestaShop and the payment server.
You can enable automatic redirection to the Payplug page.
Configuring different payplug payment methods
account list
To add / modify a payment account, go to the “Modules” menu “Payplug payment setup”.
The list of your means of payment then appears. It will be empty by default.
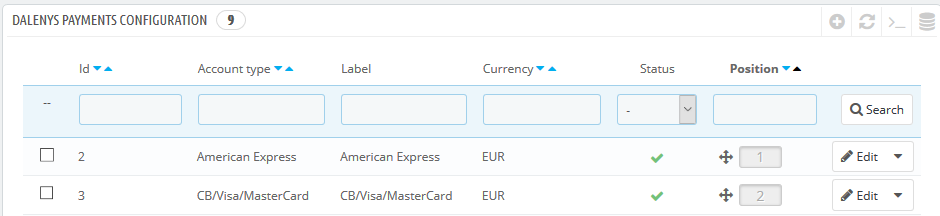
Note that you can activate / deactivate a payment method directly from this list by clicking on the status icon.
To modify a payment method, click on the item in the list or on the modify button
Finally to add a new payment method click on the “+” button at the top of the list
Account creation
When creating a new account, only the currency field is visible.
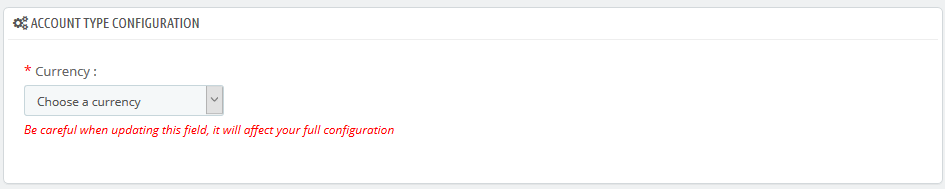
Start by choosing a currency. The page will update once the chosen currency.
Note that the currencies offered are those active on your shop (s).
Once loaded the page looks like this.
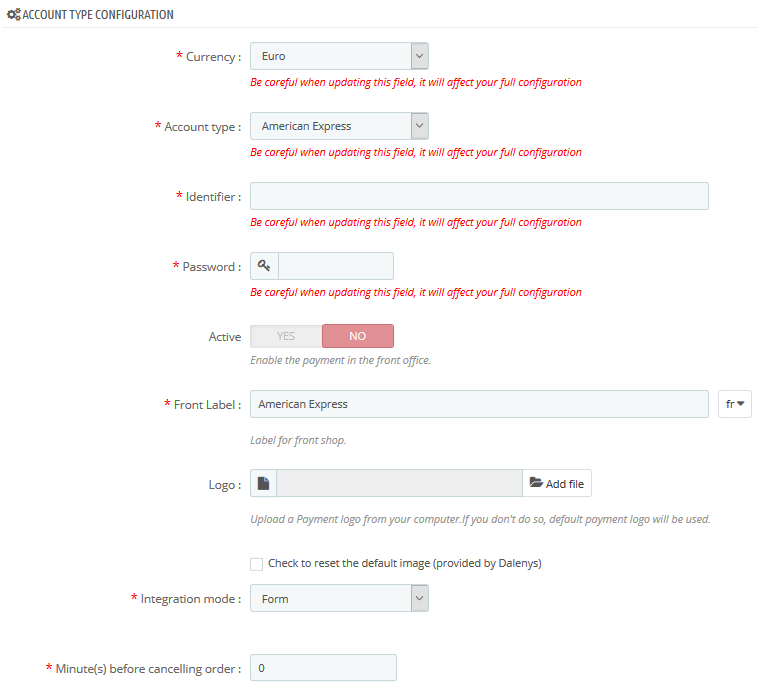
- Currency
List of the active currencies of the shop. Choose here the currency corresponding to your Payplug account.
- Type of account
List of payment methods available for the selected currency. Choose here the payment method you want to configure.
- Identify
Enter your identifier corresponding to your method of payment.
- Password
Enter your password for your method of payment.
- Activation
Allows you to activate / deactivate the payment method in the front office (can also be done from the list of payment methods see 5.1)
- Label on the shop
The wording that will be displayed on your purchase tunnel for this method of payment. By default it will be the one displayed in the account type selection list.
- Logo
By default, the logo displayed on the purchase tunnel will be the one defined by the account definition XML. If you want to customize it you can download a new logo here. If you later want to remove it check the box “check to remove the custom logo” and save your configuration.
- Integration mode
Some payment methods offer different modes of integration such as the possibility to display the payment page in an iframe.
- Authorized countries
At the bottom of the page you can choose to offer the payment method for some active countries of your shop.

Payment Options
Depending on the chosen method of payment you will have access to certain payment options.
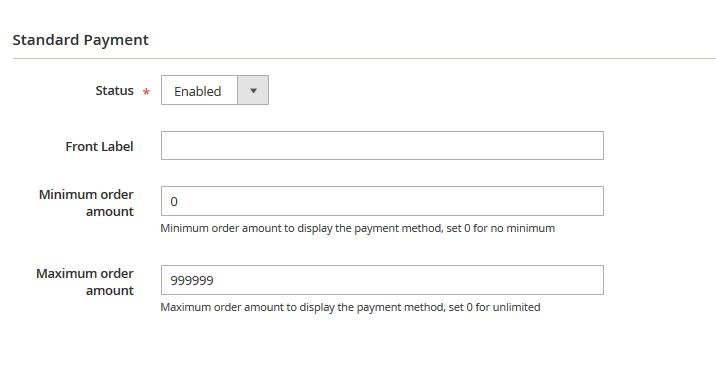
Standard Payment
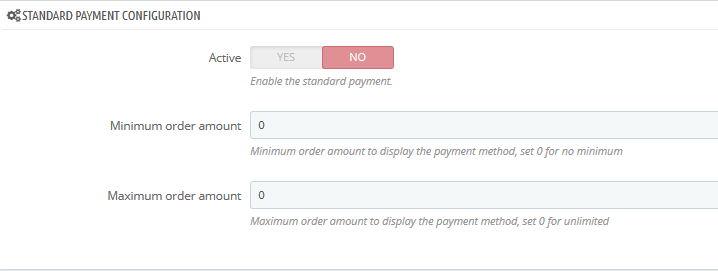
This is the basic payment.
You can enable / disable this option, regardless of the other payment method options.
You also have the option to set minimum and maximum amounts to offer this front office payment method. By leaving these values at 0 the option will still be available.
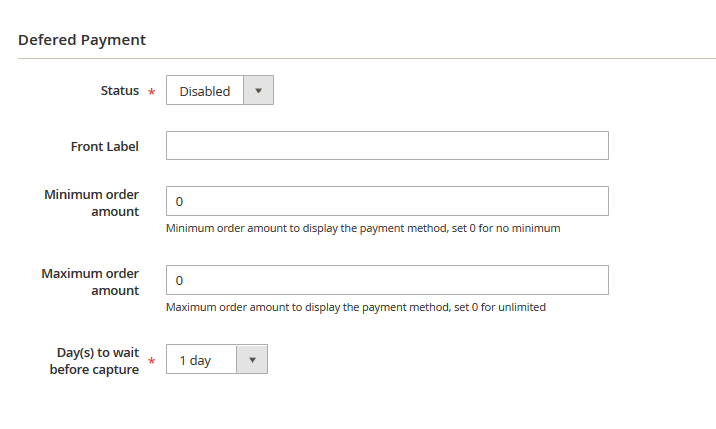
Deferred payment
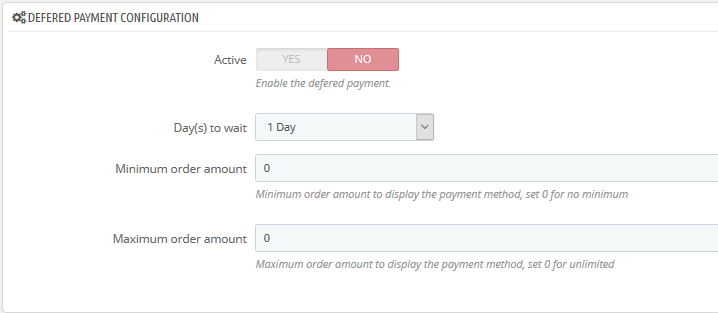
This option allows you to offer a deferred payment to the customer. It will be debited a few days after the order.
The capture of the payment will be done by the CRON of the module. The implementation of this CRON is imperative for the proper functioning of this option (See Chapter 2)
You will have to enter the number of days to wait between the purchase on the site of the merchant and the beginning of sampling.
The number of days can vary from 1 to 10 days.
You can enable / disable this option, regardless of the other payment method options.
You also have the option to set minimum and maximum amounts to offer this front office payment method. Leaving these values at 0 will always be available.
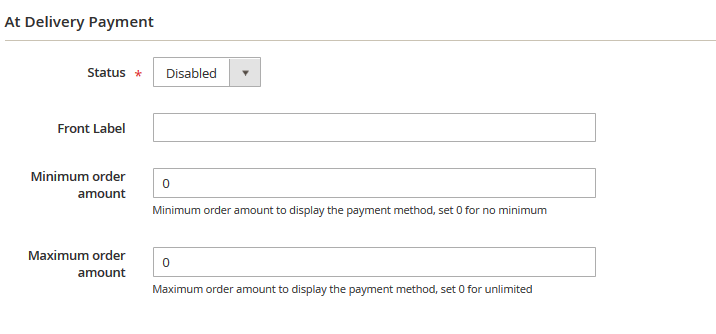
At delivery payment
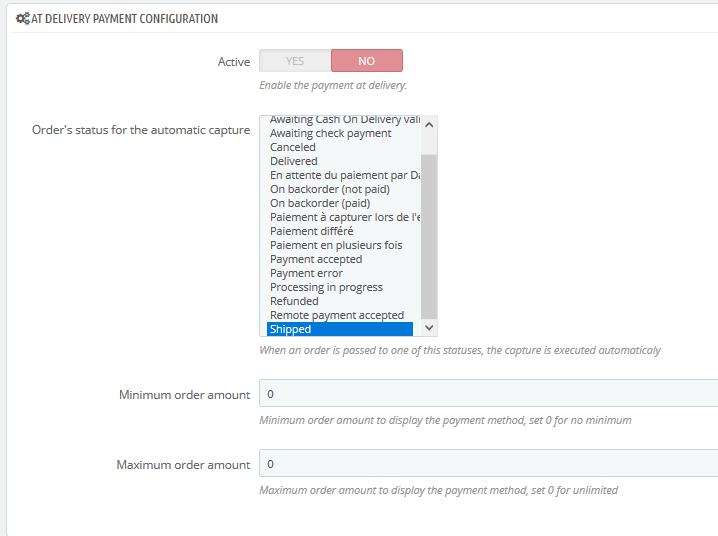
By default this option allows you to make the payment at the shipment of the order.
However, you can define one or more order statuses triggering the capture of the payment.
You can enable / disable this option, regardless of the other payment method options.
You also have the option to set minimum and maximum amounts to offer this front office payment method. Leaving these values at 0 will always be available.
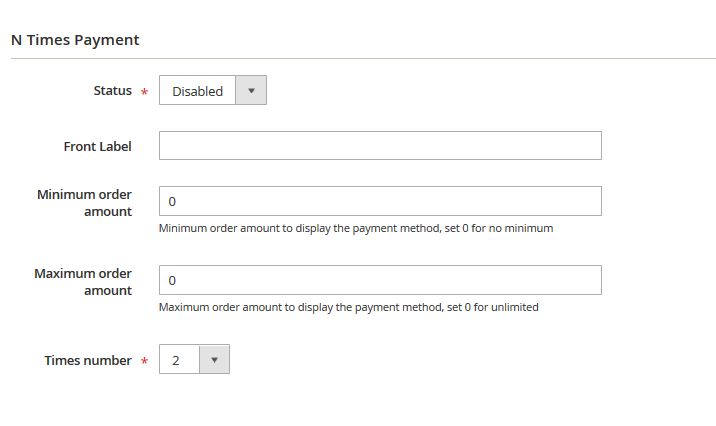
N-Times payment
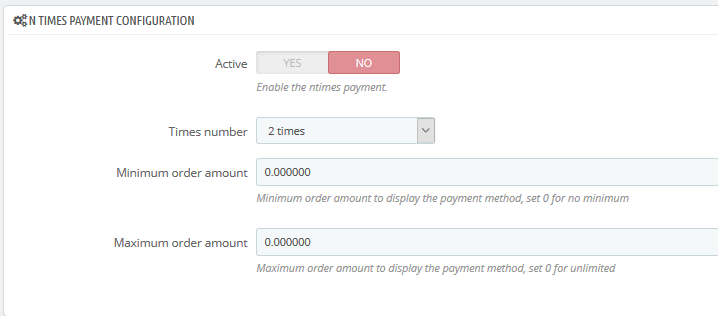
You can also pay in several installments with specific payment methods.
You must enter the number of occurrence of payments that you want to set up.
You can enable / disable this option, regardless of other payment method options.
You also have the option to set minimum and maximum amounts to offer this payment method in front office. By leaving these values at 0 the option will still be available.
3D Secure payment
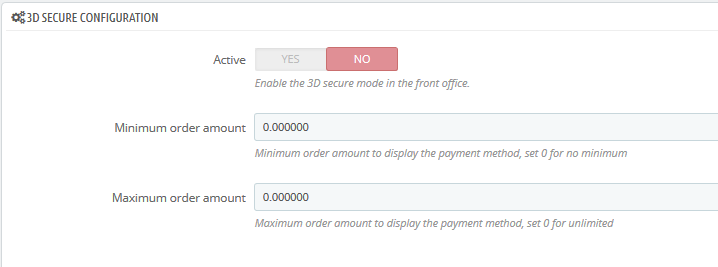
This option allows you to offer the 3D Secure for the payment method.
You can enable / disable this option, regardless of the other payment method options.
You also have the option to set minimum amounts and maximum amounts to offer this payment method in front office. By leaving these values at 0 the option will still be available.
One click payment

This option allows you to offer one-click payment for customers who have registered their banking information in a previous order.
It is possible to define whether or not you want to re-enter the cryptogram to your customers.
You can enable / disable this option, regardless of the other payment method options.
You also have the option to set minimum amounts and maximum amounts to offer this front office payment method. By leaving these values at 0 the option will still be available.
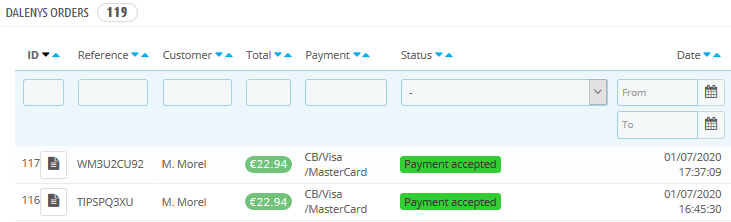
Order tracking
A list of orders paid with one of the payment methods of the module is available via the Payplug modules / orders menu.
The list allows you to locate the orders with their possible tags. Note that it is possible to filter these tags.
** Particularity of configuration of certain payment methods**
Some payment methods have special configuration elements. with peculiarities.
Cofidis
The payment method Cofidis offers an additional configuration option that is “payment option” and allows you to make payment in 3 or 4 times.
Facilipay
The payment method Facilipay offers two additional configuration options that are “payment option” that allows to make payment in 3 or 4 times and “product category” that defines a category of products sold on the shop and will be transmitted in the payment setup during a customer order.
Payplug module for Magento 2.4
Supported CMS versions:
- Magento 2.4.x
Supported languages:
- English
- French
Available payment method:
- CB Visa MasterCard
- American Express
- PayPal
- Oney 3X / 4X
- P24
Features:
- 3-D Secure
- Standard payment
- Delayed payment
- N-times payment
- One-click payment
- Refund
- Void
Context:
The purpose of this document is to describe the use of the Payplug module for a merchant. It will be explained the installation and configuration of the module. This Magento module allows merchants a “turnkey” integration of the payment methods made available by Payplug. The module is available in FR and EN.
Prerequisites
Magento
The module is compatible with versions 2.1.x / 2.2.x / 2.3.x of Magento. In case of an earlier version, we recommend upgrading your platform before installing and configuring the module.
Installation
It is recommended to make a backup of your database. By step,
- Go to the root of your Magento 2 installation
-
Create the following directories:
app/code/Quadra
app/code/Quadra/Dalenys
- Uncompress the archive in the folder: “app / code / Quadra / Dalenys” (skip the folder at the root of the archive)
-
Install the module by running:
composer update
composer require giggsey/libphonenumber-for-php
php bin/magento setup:upgrade
php bin/magento cache:clean
php bin/magento cache:flush
Configuration
API Configuration
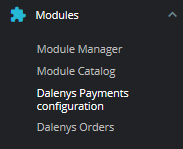
Before configuring the accounts, you must configure the API to connect to Payplug. Go to menu “Payplug> API configuration”
Payplug configuration help
This is the list of information you will need to fill in when setting up your accounts from the Payplug Extranet.
This configuration is necessary on each of your Payplug accounts to allow communication between your instance of Magento and that of Payplug.
Configuration of the API
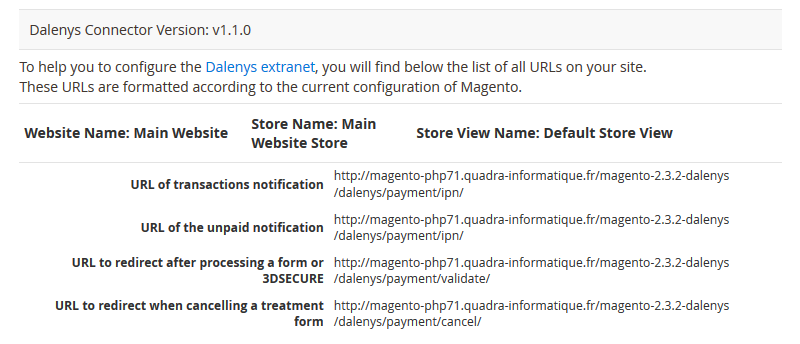
This insert allows you to configure the details of useful information so that Magento communicates with Payplug. The module is initialized with functional values. However, you will need to configure the final URLs for the fields:
- URL of the payment form
- URL of direct payment
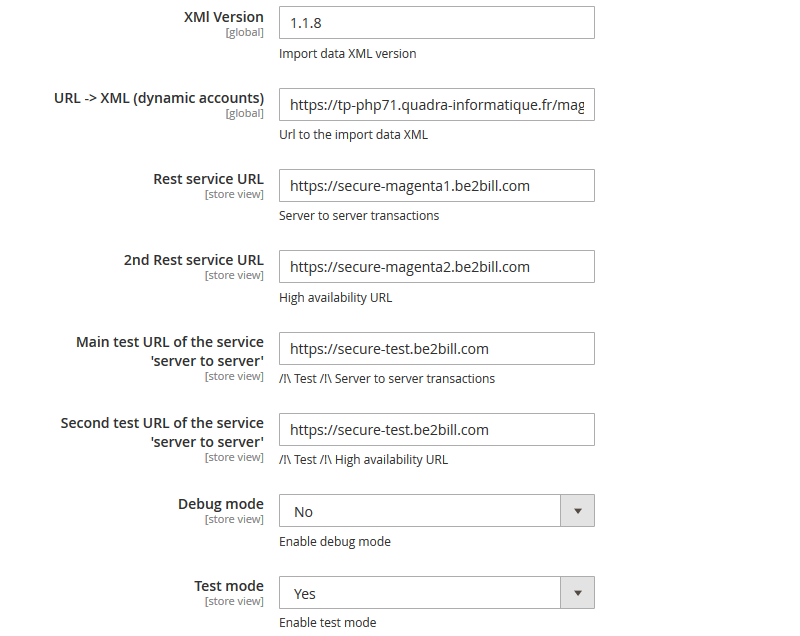
The “Test Mode” activates the sandbox to communicate with Payplug test URLs. For the switch to Production, it will be necessary to configure the “Test Mode = No”.
| Field | Detail |
|---|---|
| XML version | Informative field to know the version of XML currently imported. According to the SemVer standard, the version of the application will be based on a major version of the unmodifiable XML. Version upgrade is only possible for minor and patch versions of XML. For a major upgrade, an application update will be required. |
| URL -> XML (dynamic accounts) | URL of the account configuration XML. This XML includes the complete list of accounts and possible configuration from the “Payplug / Account Configuration” menu. |
| Primary ‘server-to-server’ service URL | |
| Secondary URL of the ‘server-to-server’ service | |
| URL of the payment form | Used if Test Mode is active |
| Test form URL | Used if Test Mode is active |
| URL of direct payment | |
| Direct payment test URL | Used if Test Mode is active |
| Debug mode | Enable specific logs for Payplug |
| Test Mode | Enable test mode, which involves calling test URLs. |
Customization error message
This insert will allow you to customize the messages returned by Payplug error codes. By leaving them empty, commented messages will be taken into account.

Payment Methods
List account
The list of accounts can be found here:Menu “Payplug > Account configuration”

Add an Account
Prerequire site

It is necessary to import the XML once with the “Import XML” button. If you do not import this one, the actions of creation of means of payment, or of migration will not be functional.
List of fields
| Champ | Detail |
|---|---|
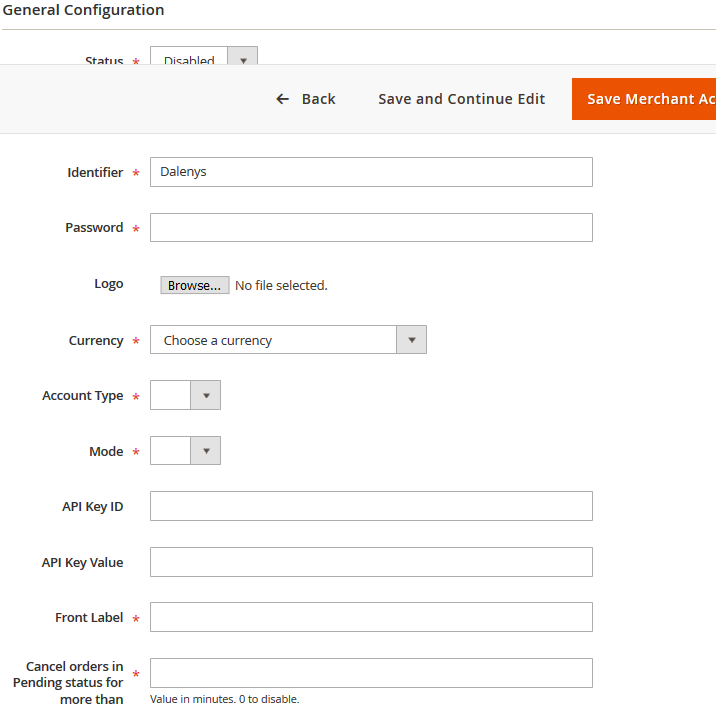 |
This insert allows the general configuration of the account. Depending on the currency and type of account, additional inserts will be unlocked ; allowing the configuration of options and method of payment. 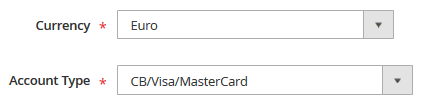 The fields in this inset are global to all the settings; except for the “Label visible on the front office”. The fields in this inset are global to all the settings; except for the “Label visible on the front office”. |
| Status | Enable or disable the account and its means of payment. |
| Shop | Allows you to select the store view on which to configure the account. Only one store view is configurable per screen. If you need to configure the same IDENTIFIER for several stores, it will be necessary to create as many accounts. |
| Identifier | Identifier not providing Payplug under the label “Identify” |
| Password | Password provided by Payplug |
| Logo | A default logo is provided by the dynamic XML file. If you want to customize it, you can import your own file. Format : ● The file will auto resize with a height of 30px. In order to optimize the weight of the page, we recommend that you import a 30px high image. ● No recommendation on the width ● Extension: svg, png, jpg |
| Currency | Select the currency to use. The drop-down list contains all the currencies provided by Magento.The selected currency updates the list of account types. |
| Account type | The list of account types comes from the “image” of the imported XML. Example: CB / Visa / MC, Paypal, AMEX, … The account type updates the mode as well as the list of available operations and options. |
| Mode | This is the mode imposed according to the type of account. Example for PayPal:imposed on “Server to server” |
| Label displayed on the front office | Label displayed on the front office from the control tunnel. The display will consist of the typed label concatenated to the type of operation. 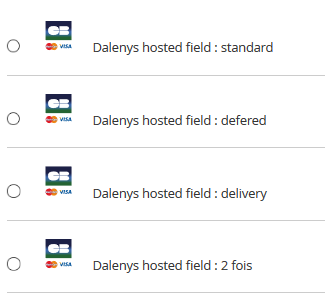 |
| Cancel orders whose status is “pending” since … | This field is used to define the number of days of validity of a “pending” order. After this period, the order will be canceled via a planned task that respects the standards of Magento. It is necessary to plan the CRON Magento via the standards of use of Magento. |
Payment options
Below is the configuration detail for each of the payment options available. The list of payment options differs depending on the currency and the type of account.
Standard payment
This is the basic payment. This is a direct payment when creating the order.
| Field | Detail |
|---|---|
| Status | Enable or disable this payment transaction. |
| Front office label | Overload the label generated from the label of the general configuration of the payment method. |
| Minimum amount of order | The payment transaction is only available if the minimum order amount is reached. Otherwise the operation will not be visible. |
| Maximum amount of the order | The payment transaction is only available if the maximum amount of the order is not reached. Otherwise the operation will not be visible. |
Note: For co-branded cards (CB / Visa or CB / MasterCard), it will now be possible to choose the banking network through which you will pass. In other words, a Holder with a CB / Visa card.
In the form of a selector, the customer can choose CB, Visa, vpay, Electron, MasterCard or Maestro.
Deferred payment
Configure the deferred payment transaction in X days ; until 10 days.
When ordering, an authorization is made from Payplug. If the command is validated, a CRON takes care of the capture under X days, then update the status of the command.
| Field | Detail |
|---|---|
| Status | Enable or disable this payment transaction. |
| Front office label | Overload the label generated from the label of the general configuration of the payment method. |
| Minimum amount of order | The payment transaction is only available if the minimum order amount is reached. Otherwise the operation will not be visible. |
| Maximum amount of the order | The payment transaction is only available if the maximum amount of the order is not reached. Otherwise the operation will not be visible. |
| Number of days | Configuration of the number of days post-trigger of the capture. From 1 to 10 days. |
Payment on delivery
The payment on delivery is automatically triggered via objects related to the Magento back office. When ordering, an authorization is made from Payplug. Warning, despite the wording, the capture is actually in the Magento INVOICING and not the EXPEDITION.
| Field | Detail |
|---|---|
| Status | Enable or disable this payment transaction. |
| Front office label | Overload the label generated from the label of the general configuration of the payment method. |
| Minimum amount of order | The payment transaction is only available if the minimum order amount is reached. Otherwise the operation will not be visible. |
| Maximum amount of the order | The payment transaction is only available if the maximum amount of the order is not reached. Otherwise the operation will not be visible. |
N-times payment
Allows to set up a facility of payment for customers. Be careful not to confuse “ease of payment” and “credit”. The ease of payment can not exceed 89 days from the date of authorization and last catch.
| Field | Detail |
|---|---|
| Status | Enable or disable this payment transaction. |
| Front office label | Overload the label generated from the label of the general configuration of the payment method. |
| Minimum amount of order | The payment transaction is only available if the minimum order amount is reached. Otherwise the operation will not be visible. |
| Maximum amount of the order | The payment transaction is only available if the maximum amount of the order is not reached. Otherwise the operation will not be visible. |
| Number of times | Configuration of the number of deadlines. From 2 to 4 deadlines. |
Calculation of the schedule
To be sure not to exceed legal 89 days of the ease of payment, the calculation of the schedule rules below:
| Deadlines | |
|---|---|
| 2 and 3 times | For payment 2 and 3 times, E1 = Day of the order / E2 = Day of the order + 1 month:In the case of order at the end of the month, if the day does not exist, we take the last day of it. E3 = Day of the order + 2 months:In the case of order at the end of the month, if the day does not exist, we take the last day of it |
| 4 times | For the payment 4 times:E1, E2, E3 ; see calculation above / E4 = E1 of the order + 89 days |
| Amount of deadlines | |
|---|---|
| 1st deadline | M2 = M3 = M4 = integer value (TotalAmount / TotalNumberDeadlines) |
| Other deadlines | M1 = TotalAmount – ∑(M2, M3, M4) |
3D Secure Payment
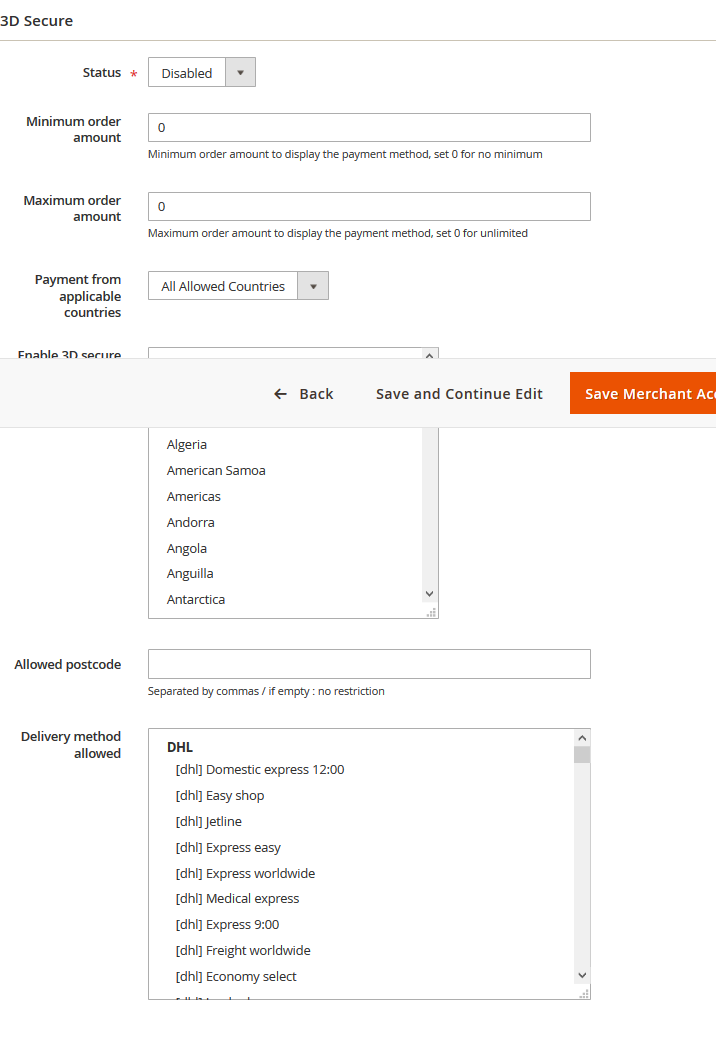
The 3D Secure payment makes it possible to provide additional security to the act of purchase. The activation of this can be complete or selective.
| Field | Detail |
|---|---|
| Status | Enable or disable this payment transaction. |
| Minimum amount of order | The payment transaction is only available if the minimum order amount is reached. Otherwise the operation will not be visible. |
| Maximum amount of the order | The payment transaction is only available if the maximum amount of the order is not reached. Otherwise the operation will not be visible. |
| Enable 3D Secure only for countries | Selects a short list of delivery countries for which 3D Secure is enabled. For a complete selection, please select the complete list : Click in the “multiselect” field / Ctrl + A |
| Postcode 3D Secure | List of postal codes where the 3D Secure is active. If the field is empty, no restriction, the 3D Secure is active for all previously selected countries. |
| Authorized delivery method | Selects a short list of delivery methods for which 3D Secure is enabled. For a complete selection:Click in the “multiselect” field / Ctrl + A |
Click Payment
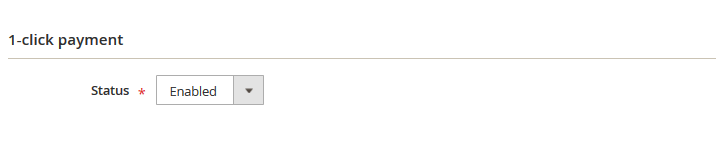
OneClick payment allows the customer to pay for their order, as the name of the option indicates, in 1 click.
| Field | Detail |
|---|---|
| Status | Enable or disable this payment transaction. |
| Entering the cryptogram | Enable or disable the security of OneClick via the required entry of the cryptogram. |
Prerequisite:
- The option is enabled
- The customer has an alias on the payment method
- He must have agreed to register his card number.
- The card must still be valid
Using OneClick
From the order Tunnel
When an alias is available, and it is valid, we display a list of choices to the client:
- Use my pre-registered card Allows the customer to avoid having to enter their credit card numbers.
- Replace your credit card data Allows the customer to change its registered bank card It is not possible to have several credit cards for the same method of payment.
- Pay directly with another Bank Card Allows you to use exceptionally another bank card, which will not be registered.
From a product sheet
Allows to order in one single click. At the click of the button “Pay”, the order is immediately taken into account. The customer lands on the order confirmation page.
Active CSC
If the verification of the cryptogram, the customer will have to enter the cryptogram on the back of his card, then validate his order for it to be taken into account.
Muticapture / Multirefund
The multicapture and multirefund options are compatible with each other. It is therefore possible to make multiple refunds on orders that have been captured in several times. Below is a chart with the complete list of possible catches / repayments.
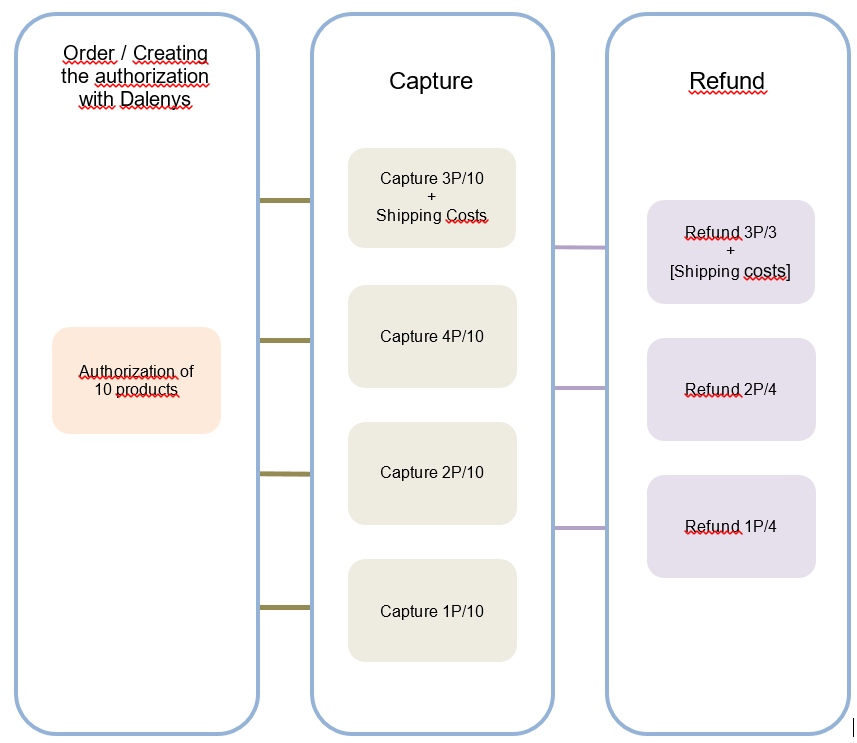
The catch and refund list will be visible in the “Transactions” tab of the order.
We implemented the module to allow to capture a command in several times.
Multicapture only works from the Magento back office ; only the capture of “whole” products is possible at the time of invoicing.
- This feature is therefore available for the “On delivery” payment transaction.
- Delivery costs are systematically captured during the 1st billing.
Multirefund
Multiple refund is possible from the Magento back office; only the refund of “whole” products is possible.
- The refund must be done on the invoice and not on the order.
Only the elements of an invoice can not be refunded from this invoice. Indeed, it is necessary to link a repayment transaction to a parent capture transaction. Only the invoice can allow the link.
Additional information listing of orders
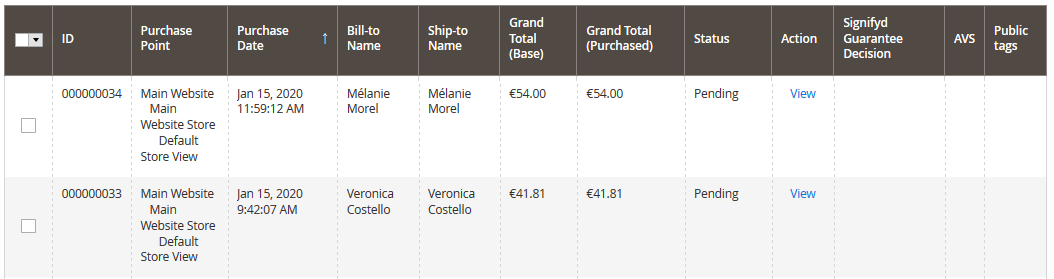
Tags
The Payplug public TAGS are displayed in the list of orders in the form of tips. There are 4 different types of tags (GOOD - CHECK - SUSPICIOUS - POTENTIAL FRAUD)
AVS
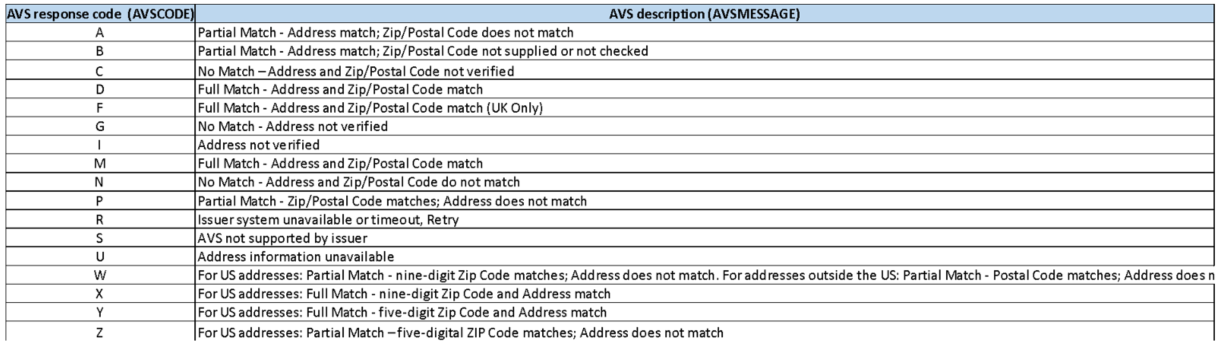
AVS is a feature allowing you to trace the result of an AVS check (Address Verification System), ie additional information on the billing address. Please contact your Account Manager to check if you’re eligible for this offer.
Edit an account
You can now directly modify the position of a payment type online so that you can choose the display order in the store.

Trigger sending e-mail order confirmation on payment
Summary
Magento 2 generates an e-mail sending to the order creation which is carried out before the payment.
This behavior can generate misunderstandings among the merchant’s customers. The Payplug module has an overhead that allows you to shift this e-mail to the payment validation.
Configuration
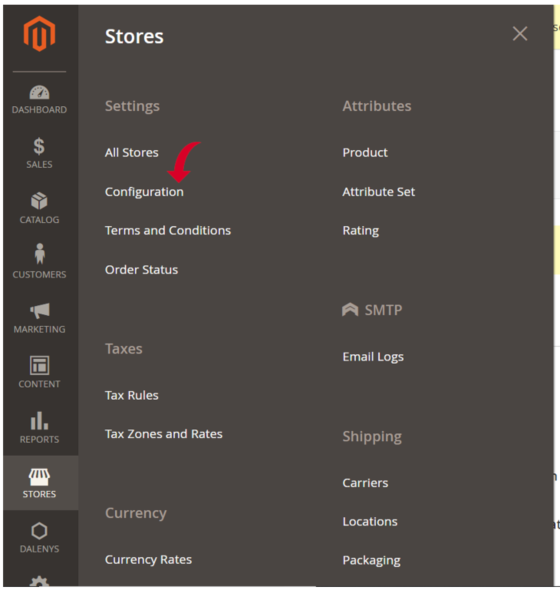
In order to activate the shift of the sending of e-mail, it is necessary to go in your back office then in Stores > Configuration
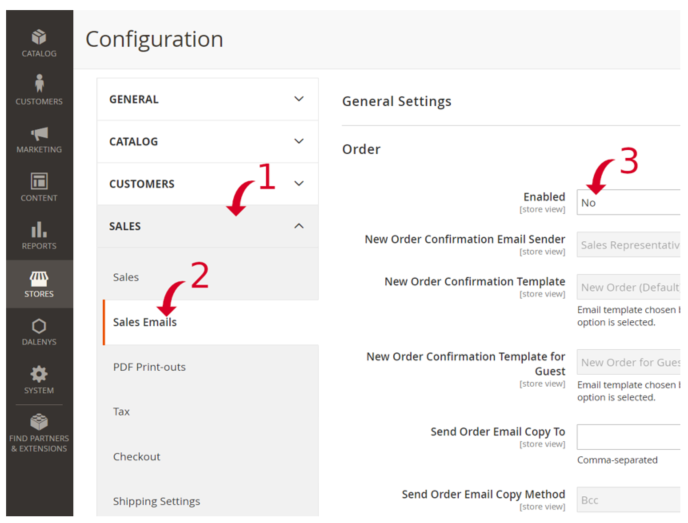
- Click on “Sales”
- Then on “Sales Emails”
- Disable only the Order part
The e-mail is now sent to the payment and no longer to the creation of the order
Official SDK
Here are some libraries covering different languages.
These SDK are officially maintained by Payplug. In case of questions, bugs, security issue feel free to contact support through the help center : https://help.dalenys.com/hc/fr/requests/new.